Rockové klávesy - Nastavení křivky dynamiky úhozu u klávesových nástrojů, část 2
Rock keyboards: velocity curve MIDI mapping for expressive performances, part 2
Different velocity curve settings
Very Light: On this setting you play the keys very lightly and the keys respond respond as though you were playing them harder. This is a rather uncommon setting that is rarely used.Light: This setting is good for synth players who want the keys to respond as though you were playing them a little harder.
Normal: This is the normal velocity curve.Heavy: Select this curve if you play the piano keys heavily, but wish for the piano to respond as though you were playing them a little lighter.
Very Heavy: Select this curve if you play the piano keys very heavily, but wish for the piano to respond as though you were playing them a lighter. This extreme setting is generally not useful

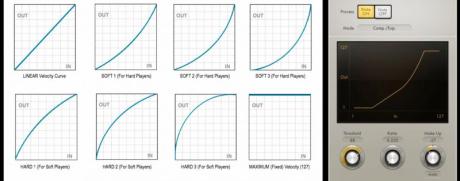
to most players.Some keyboards represent their velocity curves according to shapes. In some recording software you can see terms like linear,
convex, concave and saturated. Garage Band has a slider on each track that you can use to adjust velocity sensitivity. The linear setting is most like the normal setting mentioned above, the convex curve will give you greater control over louder notes, the saturated curve will help with keyboards that don’t generate maximum MIDI velocities, and the concave curve is best if the quiet end of the MIDI velocity range feels like its not super responsive.Many modern samples have quite a few velocity layers. if your keyboard doesn't let you generate the full range of velocity values, your sounds may lack expression so choose a controller carefully if you want to get maximum sensitivity. The less expensive controllers are usually not as strong in this area.
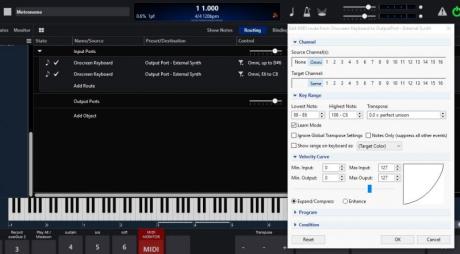
Advanced velocity applications: filters, multi samples, and rhythmicAnother interesting application
of velocity curves can be to assign velocity to control a filter. If the sound doesn’t have a great dynamic range, this can be a great way to give it some motion. Different DAW’s and keyboards have different ways of dealing with this, but on most systems you can route the velocity to control the filter. In your bussing, choose filter cutoff as destination and velocity as source, then set the amount to all the way up. This will cause the filter to open up at higher velocities and close at lower velocities. Another useful way to use velocity on a sampled instrument is to assign multiple samples to one note. You can do this by assigning each sample to different velocities, or a range of velocities, so that the sample will only play when the right velocity is hit. And lastly, when programming velocities for rhythmic parts, using random velocities can give you some interesting effects for rhythmic and percussion parts.

Convex: Konvexní křivka je taková, která je „vyklenutá ven“. To se dočteme na Wikipedii, ale jak nám to pomůže při chápání citlivostních křivek? Zjednodušeně si to můžeme představit tak, že maximálních MIDI hodnot dosáhneme pouze tehdy, když hrajeme opravdu silně. Strmost křivky se k jejímu konci zvyšuje, a tak zatímco při nižších intenzitách úhozu negeneruje křivka velké rozdíly, při hraní fortissimo bude i malý rozdíl v dynamice úhozu produkovat výrazné změny v hlasitosti či barvě.
Concave: Konkávní křivka je vlastně opakem konvexní. Větší rozdíly ve výsledné hlasitosti se projevují při hře pianissimo, naopak při velmi silném úhozu už se intenzita a barva zvuku mění jen mírně.
Velocity layers: Tento výraz popisuje vrstvy, z kterých se skládá sampl. Zvuk samplovaného nástroje je nahrán v různých intenzitách úhozu a výsledné vrstvy jsou následně přehrávány v takovém poměru, který odpovídá dynamice hry. Obzvláště u samplů akustických nástrojů tak lze dosáhnout většího realismu. Například když hrajeme silněji na akustický klavír, zvuk není pouze hlasitější, ale také „břinkavější“, ostřejší, s vyšším obsahem vysokých frekvencí včetně alikvotních tónů. Rychlostní vrstvy nám tak pomohou o něco více se přiblížit ke skutečnému klavíru.

Bussing: Tento výraz označuje menu, v kterém můžeme zvolit, jaký efekt budou mít jednotlivé parametry. Velocity neboli intenzita úhozu je jeden z těchto parametrů. Můžeme tak k němu přiřadit, cokoliv se nám zamane, například právě filtr, jak ve článku popisuje Brian.
Open up and close the filter: Otevírání a zavírání filtru znamená vlastně to, jak velké množství vyšších frekvencí bude přítomno v signálu. Když se filtr „zavírá“, stále více ubírá výšky (a případně i středy). „Otevíráním“ se vlastně účinek filtru snižuje, tedy vyšších kmitočtů přibývá.


